Lotus Europa S1: Competition radius arm mounts
Hi everyone,
In this post I’ll explain to you how and why I made competition radius arm mounts for the rear suspension on my S1.
The reason why is quite simple: They are more precise than the original rubber mounts and offer better control of the alignment of the rear suspension. There might be some more road noise, but this won’t be a car to be used to go to the shops, so I’m not too worried about that. Also, when the bearings are past their best, I can easily replace the bearings in the radius arm mounts by removing a circlip, without having to remove the mount from the chassis. If this was an original mount, you would have to remove them from the inside of the chassis and this is a very difficult job on an S1 while the engine is installed.

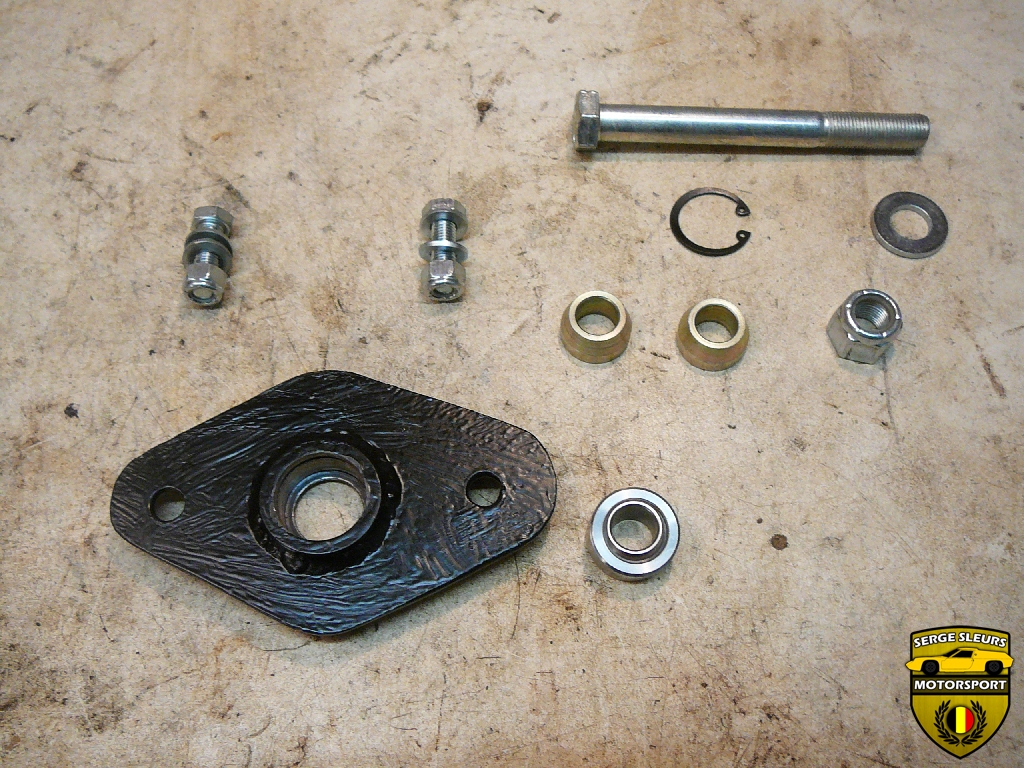
These are all the parts necessary to build my version of the competition radius arm mounts. We have four high alignment spacers, to let us use the full articulation of the two Teflon-lined spherical bearings that will be retained in the steel bearing housings by the two circlips. This housing will be welded to the three mm thick plate that uses the original mounting holes, so I can always revert to the original style radius arm mounts. I designed the plates on the computer, printed some templates and cut them by hand using a jigsaw. The bolts will act as a pivot bolt for the radius arm mounts. I bought all of the bearings, housings and assorted parts from McGill Motorsport.

After calculating the best offset needed for the position of the housings, I spaced this out using some washers. This spacing is important for the toe setting of the rear suspension.

Here we can see how the bolt and the high alignment spacers will be used to make sure that we have full articulation. If we wouldn’t have these, the nuts and washers would hit the housing and limit movement.

Using the spacers mentioned above, I tacked the housings to the plates to lock in their position, before welding them up completely.

Before welding, we check the position on the chassis to make sure we haven’t missed anything in the design process.

Now I TIG weld the housings to the backplates.

They are welded on both sides of the housing to ensure rigidity.

While welding, the housings got a little bit too hot and had warped a tiny bit to make it harder to insert the bearings than before welding. I could have used a press to install the bearings, but this would make changing the bearings while the mounts are installed on the car near impossible. So I used a dremel tool to relieve the housing a bit so that the bearings will slide in as before.


This is the old, 1967 original, radius arm mount next to my ‘competition’ version.


I’ve installed everything onto the chassis, to double check and to get a feel of my new creation.

Again, old vs new, this time with the bearing and pivot bolt installed.

And this is how the rear radius arm will fit on our new mount. The only modification that i necessary to the radius arm mount, is to drill out the bushing for the bolt from 11mm to 1/2 inch. I’ll show this when we do the rest of the work on the radius arm mounts.

An overview of the painted radius arm mount (black Epoxy-Mastic) and all the assorted parts before assembly.

I’ve installed the spherical bearings in their housing using some copper grease to prevent corrosion in the housings.

The bearing is retained by a circlip.

When it’s all said and done, this is how my ‘competition’ radius arm mounts look mounted on the chassis.
Since then I’ve added big, thick penny washers on both ends of the big bolt to act as security measures should the circlip fail. This way I will not lose the radius arm mount if the bearing decides to come out of its housing, but will merely loose the alignment at one end. This will hopefully be enough to stop and park the car if the worst case scenario would happen.
Hopefully you’ve enjoyed this write-up, if there’s anything that isn’t clear, or you would like to know more, you can contact me through the link on the top of the page.
Serge