Lotus Europa S1: Competition engine mounts
Hi everyone,
In this blogpost I’ll explain to you why and how I made my own ‘competition style’ engine mounts.
First of all, the original rubber bushed Lotus engine mounts, fail regularly. This happens more so on the Twin Cam engined Elans and Europas than on the Renault engined models, because of the heavier engine. You can buy uprated mounts, either with stiffer rubber or with polyurethane inserts. There are a couple of ways these are made, Banks Engineering, Kelsport and Tony Thompson all have their own version, but you can make them yourself for quite a bit less money. And doing it yourself is a lot more rewarding.

In this picture you can see what we’re working with. On the right there’s an old original engine mount, with the rubber bush. On the left you can see the metal parts of the other original engine mount stripped of the rubber and cleaned up, some polyurethane bushes, steel housings for these bushes and some new bolts, nuts and washers. These are all the components for our new engine mounts.

You start off by measuring where you want the bush to sit and mark it on the outside of the engine mount.


Then you can punch the center of the hole to use as a drilling guide.

Starting off with a small pilot drill and then going to 1/2″.

The middle part of the original engine mount, the one where the engine actually mounts to, needs to be drilled in the correct location for the housing to be welded into. Measure twice, cut once.

Once we’ve cut all of the pieces, we can mock it up, to see if it will work or not… And it did!

I used some washers to get the correct spacing and having the plate in the center of the housing. Then I tacked it up to check the fitment.

All of the parts laid out once again.

Then I TIG welded the housing up completely. I’m getting a bit better at this welding thing.

I painting the steel parts with some Zinc-spray to prevent corrosion.

Afterwards I sprayed a high build primer and a 2K semi-gloss black with my HVLP turbine. The parts came out quite good, definitely for my first time painting with a spray gun.

Time to assemble them!

First, use the supplied grease to lube up the bushes and press them in by hand.

I used my vice to press in the stainless sleeves. Again, use the grease!

Bush installed, now you can insert the center part into the big housing.


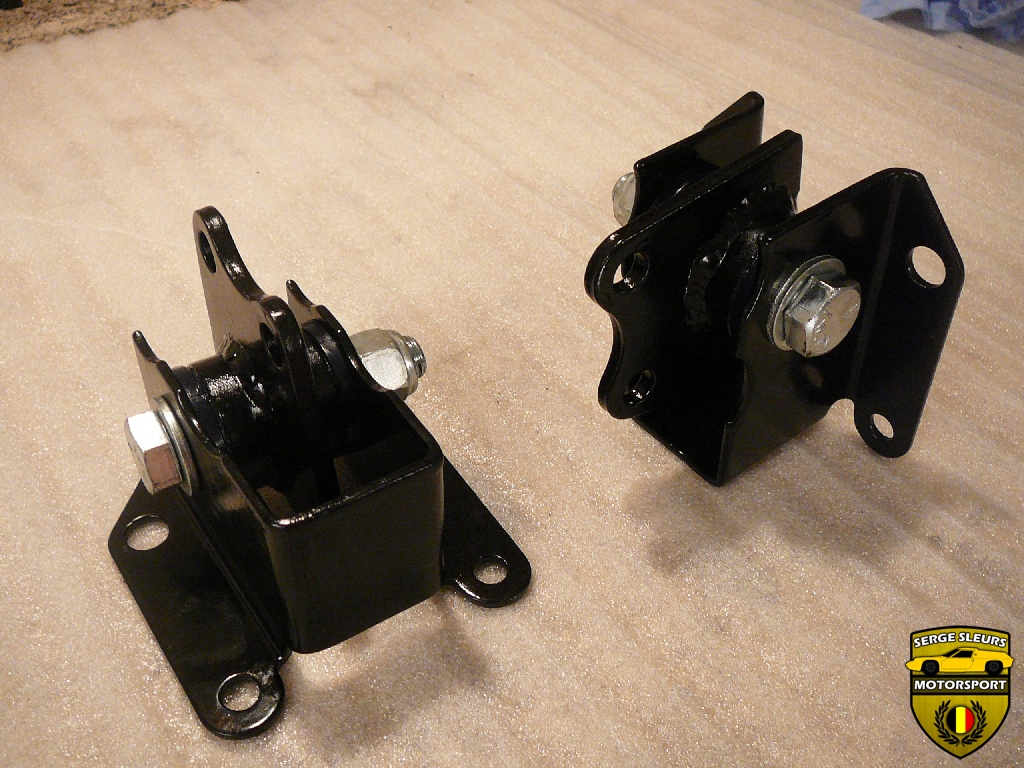
Both engine mounts completely assembled and ready for installation.

And this is how they look installed onto the chassis. They are completely interchangeable with the original style engine mount, if I should want to revert to that style of mount.
Share & Enjoy!
Serge