Lotus Europa S1: Front brake calipers
Hi everyone,
I’m finally catching up on posting all of the work I’ve done on the car in the last months. In this blogpost I’ll tell you everything you need to know about restoring and rebuilding the front brake caliper of an early Lotus.
The calipers on a Lotus Europa are the same as used on the Lotus Elan and on the later Triumph Spitfires, namely the Girling 14LF caliper. This has some advantages, but also some disadvantages, as I will explain later.

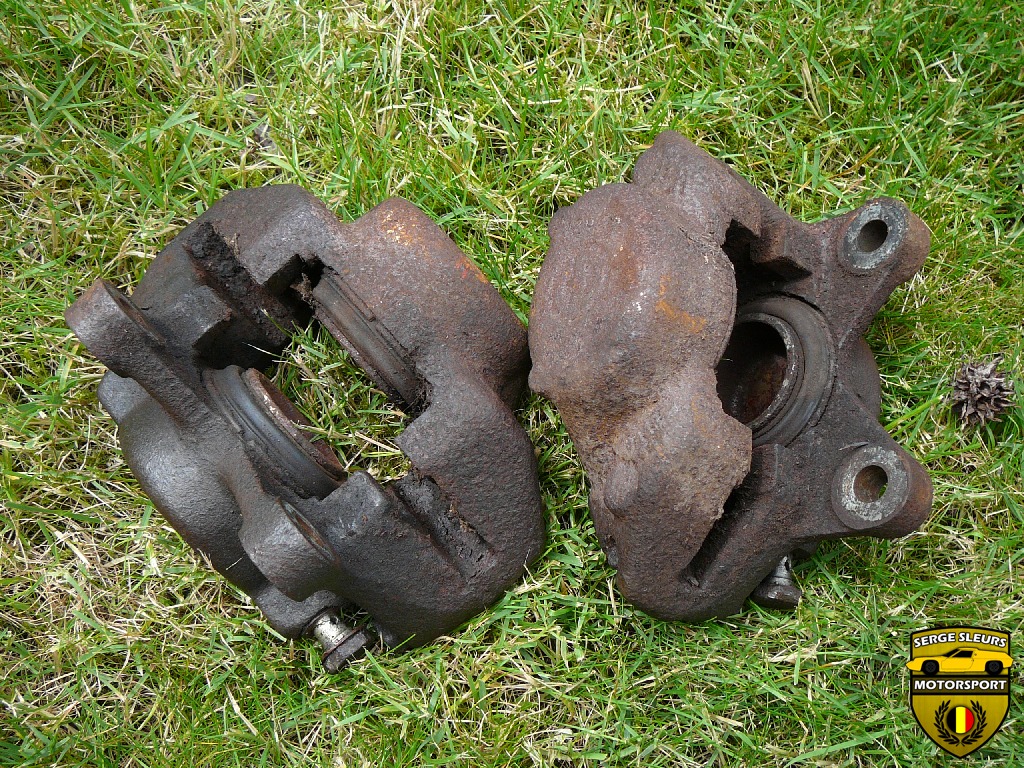
This is what the calipers looked like when I took them off of the car in 2011/2012. They were very! rusty and the pistons were stuck in the calipers.

To remove most of the rust I put the calipers in a bucket of vinegar before I attempted at disassembling them.

After they had been soaking in the vinegar for a day or two I brushed one of them off with a wirebrush. The left one has been cleaned with minimal effort and minimal money spent.

In the photograph you see here, I already disassembled the calipers and they had been waiting to be rebuild for almost two years, so a bit of rust had returned.
Now, before we got to that point, I had to get the stuck pistons out of the calipers. I tried compressed air, but they would budge. (If you try this, put a block of wood between the calipers, so that they won’t fly across your workshop.) Then I used a grease-gun to pump some inexpensive grease in the calipers and they came out! It worked like a treat! The only downside is that you have to clean all of the grease out of the inside of the calipers.
I also removed all of the original seals and gaskets.

After I took the caliper halves out of storage I gave them another vinegar bath and a good clean. You can see the metal having become a bit dull because of the acidic vinegar. It is some grey residue that was left after removing the rust.

The residue was gone after cleaning the metal with brake cleaner and some thinners. I taped off all the parts that I didn’t want to get any paint on.

The paint I used was POR15 heat resistant paint, because I thought that this paint would be better for brake calipers that would be used in a sporting fashion. However, this experiment backfired a bit, but I’ll explain later. The colour I chose was ‘Aluminium’.
no images were found
The paint was brushed on using a small brush, you can see some of the brush marks, but they even out quite well.

When the paint was dry, I had to clean up some of the edges near the masking tape, but all was quite well.

Now, heat resistant paint has to be baked at 180°C to be stable. I put the calipers in an old kitchen oven that we had standing around.

In this photograph you can see the problem quite clearly. The paint started to bubble. After some googling, I found out this was a common problem with the POR15 heat resistant paint. After the calipers cooled down, I could easily rub the bubbles out and at the moment you can’t tell they were ever there. But I’m keeping in mind that there is a chance that this paint won’t last very long once I start driving the car. If that’s the case, they’re easily repainted with a more suitable alternative or even zinc-coated.

I cleaned out all of the threads with a tap, because some of the paint had gotten into the threads.

This is the brake grease that I used to reassemble everything, it is silicon based so it is completely compatible with brake fluid. If you can’t find any, contact me, I had to buy a very large tube and am glad to sell you small quantity.

The nice thing about 14LF calipers, it that the rebuild kits are readily available and quite inexpensive. These are all of the components of a rebuild kit.

In addition to the kit, I opted for stainless steel caliper pistons in stead of the standard steel pistons. This will make sure that these pistons won’t ever get stuck in the calipers again. I got these from ChicDoig.

Before I installed anything, I polished the bores of the calipers with a small brass wirewheel on a dremel. Afterwards I greased up the bores with the caliper grease mentioned above.

This is the greased up piston seal and this is installed in the groove in the bore of the caliper body.

The piston is covered in grease quite generously.

Before it is inserted squarely into the bore of the caliper.

The piston is pushed all the way down, and the outer dust seal is installed. The inner lip goes into the groove on the outside of the piston and the outer lip goes over the ridge on the outside of the caliper bore.

This is what it looks like installed.

The retaining ring pictured here is opened up and slid over the dust seal to keep it in place.

However, this is a lot harder than it actually looks. Getting the ring on there, without accidentally nudging the seal so it pops off, was by far the most frustrating task of the rebuild.
no images were found
Both caliper halves ready!

singlepic id=657 w=640 h=480 float=none]
If you read the workshop manual, it will say that you should never split the calipers. But doing all of the work above without splitting them is nearly impossible and you still can’t replace the bolts. One of the reasons not to split the calipers is because the small square section O-ring that seals both caliper halves isn’t readily available. In the US you can get it from Pegasus Auto Racing and in Europe you can get it from Anglo Parts (Part n° 052.574).

When I reassembled the halves, I used brand new UNF bolts in Grade S like they used in period.

Another difficulty in splitting the calipers, it that there aren’t any torque specs available in the workshop manual. Because that it’s a common caliper in Triumphs and a variety of other cars like Ginettas, I found some information online on the bolt torque. But here is the catch: There are a LOT of 14LF calipers with very small differences. And I found out the hard way.

As you might see, the bolt broke off in the caliper. It seems that the torque-specs that I found were for a variant with bigger bolts.

You can see another one of the bolts here and the centre section of the bolt that was already stretching when the other one broke.

I managed to extract the piece of broken off bolt, by welding the other end on the tip and threading it all the way out. In the end I bought new bolts and torqued them to 17 Lbs. Ft. (23 Nm) as per the standard torque spec for bolts this size in the workshop manual.

The brake pads that I will be using are the fast road/trackday pads supplied by Europa Engineering, these are Mintex 1144 pads. The pads came with the anti-squeel adhesive pads, but I didn’t use them as this made them too thick. I also bought a brake pad fitting kit which includes the anti-squeel shims, the pins and the P-clips.

This is what they look like installed on the caliper, but it’s far easier to install these once the caliper is mounted to the car.


Having mounted the caliper to the car, you can see the difference in gaps on either side of the brake disc.

The way to fix this, is to use shims to space the caliper evenly on the disc. This isn’t something they did in the factory, but it is important to optimise your braking system. The shims are 0.5mm thick. I had to buy 16, but in the end only used four, so contact me if you need any, I’ll sell some on to you.

After the shims were installed, you can see how even the final spacing is.


It starts to look like a complete assembly, only the details need finishing. The discs I use are the uprated grooved discs from Europa Engineering.

This is one of the original brake lines, you can see that these are just about ready for the bin.

But the thing that we need off of this, we would almost miss. On the end there is a brass adaptor to go from -3 brake line to a 3/8″ Banjo fitting.

I’ve cleaned one just using a brass wire brush and a rag with some Autosol polish. The top one is finished versus the bottom one straight off the car.

A comparison between before/after cleaning the brass adaptors.

Here they are installed on the new brake lines.

These are HEL brake lines for Lotus Europa’s sold in a kit. These have a lifetime warranty, the quality is equal to Goodridge and are quite a bit cheaper. These have a black outer coating on them, but they are available in a lot of different colours. The only downside that I could find, is that they are exactly as long as the originals were. Some manufacturers will add a bit more length to compensate for the rigidity of the stainless braid. I’ve seen some others on ebay for about the same price, with the same warranty and the extra length, so they might be worth investigating.

I had bought some stainless bleed nipples, but they were too short for the calipers, so I had to buy some longer brass ones that are a perfect fit. I also bought a stainless banjo bolt from Torques and some copper washers from Namrick.

When everything is installed, it looks like this. The banjo adaptors that I took off of the original brake lines give this a very clean look. On the S2 Europa’s there would be a small section of copper brake line from the caliper to the upright, and then the flexible brake line to another hardline on the chassis. This setup completely removes the outboard section of copper brake line.

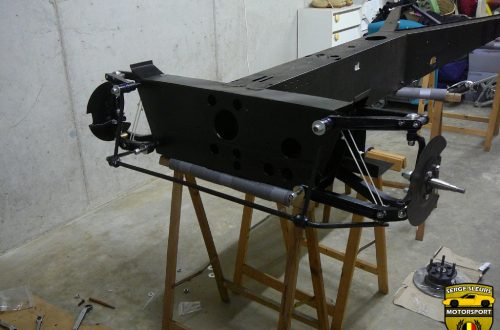
And this is an overview shot of the front suspension and front brake system as it looks at the moment. You can see some of the ancillaries like the master cylinders and the brackets for the steering rack, but I’ll get to those in due time.
This is the end of this post! If you have any questions or comments, don’t hesitate to contact me via the link on the top of this page.
I hope you’ve enjoyed this blogpost! The video will follow soon!
Kind regards,
Serge