Lotus Europa S1: Front suspension
Hi everyone,
This post will be about the next big step in the restoration, the front suspension. There are a lot of photographs, so take a cup of coffee and relax.

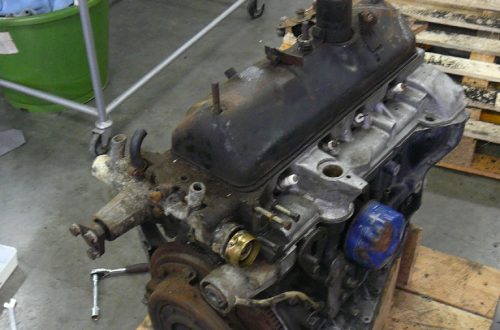
This is an overview pictures of all of the front suspension components: wishbones, trunnions, uprights, steering arms, hubs, shocks, anti-rollbar, … As you can see, everything needs work. Most of it will be restored, but some things (like shocks and brake discs) will be replaced.

I started off with putting all of the rusted steel parts (wishbones, etc) in a bucket of vinegar to let it soak for a couple of days after I quickly removed all of the loose dirt with a wirebrush.

Once it has been soaking, I’ll take it out and I can use a wirebrush to remove the rust very easily, then you need to rinse the parts in some water to neutralize the acid from the vinegar. You can help this by putting a little bit of baking soda in the bucket of water.

I you don’t rinse it well enough, the acid will make the part flash rust very quickly! This is in a time-frame of 10 minutes. Fortunately it’s a very thin layer of surface rust and this is easily brushed off. Drying the parts will also help to prevent this.

These are some of the parts after the vinegar treatment, they look a lot better! I still cleaned them up with a wirewheel on an anglegrinder and a small one on a dremel, just to get into the nooks and crannies.

This is a comparison between a before and after treatment of the disc brake backplate.

Most of my wishbones were in pretty good condition considering that they’re almost 50 years old. The lower wishbones on the front right side had some dents in the sides were the ARB had made contact during a previous accident. The wishbones were straight, but they didn’t look very nice. Firstly I tried to correct it a bit by using a hammer, and it worked.

To make them 100% straight again, I needed something different. This is a trick that I read about on a Lotus Elan forum, so I thought I would try it as well. You just put the lip of the wishbones that’s bent, and put it between the two jaws of a big vice, and then you tighten it as hard as you can to press the steel back into shape. Repeat if necessary. They looked very presentable afterwards.

Once I removed 99% of the rust, I hung all of the wishbones to paint them with the rust converter.

After the converter did it’s job, I painted them with two coats of EpoxyMaster paint.

I chose to replace all of the bushes with polyurethane bushes. I used a kit from Autobush (listed for Lotus Elan, but they share the front suspension design). I chose Autobush because of the price, their kit is a third of the price of their competitors. It comes with stainless steel inserts and a few tubes of polyurethane-friendly grease.

Because the bushes were so stiff, I tried to soften them a bit by letting them soak in hot water, but it didn’t really make a difference.

I used a big vice to press them into the wishbones, I put a little bit of grease on the inside of the housing and on the outside of the edge to ease installation.

I had a little trouble getting the overhanging edges of the bush to seat properly, but I managed in the end. The kit was OK, but the polyurethane that they use seems very stiff and unforgiving compared to the other bushes that I had from Superflex. The Superflex bushes are a lot easier to install and aren’t so easily damaged. You get what you pay for in the end.

Before you install the stainless sleeves, you need to fill the bushes with the supplied grease. The inside of the bushes have a crosshatch pattern to help retain the grease. This is supposed to prevent any squealing bushes when they are in motion.

Once all the bushes are in, we can start to reassemble the wishbone assemblies. Pictured here are all of the components needed for the upper wishbone assembly: Four restored wishbones with new bushes, two new upper balljoints and new nuts, bolts and washers.

This is what they look like all assembled.

The uprights and trunnions really look worse for wear, but I’ll show you how I cleaned them up.

The trunnions don’t have any play in them, so they just a good clean.

I started off by using a brass wirebrush to remove all of the gunk. Then I used a small brass wirewheel on a dremel to get into all of the small nooks and crannies.

Using some Autosol metal polish, the brass cleaned up really well and got a nice shine. I also painted the steel bottoms to stop them from rusting. I installed new polyurethane trunnions bushes from Superflex (listed for Lotus Elan). Now they’re ready to be installed.
no images were found


The uprights got the same vinegar – wirebrush – paint treatment as all of the other suspension parts.

Once everything is painted we can install the new stub axles and the restored trunnions.

Looks good! But they need a little bit of tweaking, I’ll explain later.


It starts to look like an assembly when the disc backplate is installed.

I seem to lack pictures of the hubs before I started working on them, but you can make them out in the overview picture. I removed all of the original wheel studs with a big hammer. Just a few hard blows will remove them. After this it’s time to remove the bearings, but I forgot to take pictures of this as well! (I do have some video, so you’ll be able to take a look at that.) You just use a punch and a hammer to hammer out the outer races from the inside of the hub.

These are the old outer races, you’ll want to hang on to these until you’ve installed the new ones, because we’re going to use these to press in the new bearings. Afterwards I put the hubs in the vinegar to remove the rust.

The wheel stud pictured above are the ones that I am going to use to replace the originals because they aren’t long enough for some aftermarked wheels and they also have the tendency of breaking!. They are 62mm long wheel studs for Fords with a 13.1mm knurl. They will fit with very little modification and have a thread of M12x1.5. I was going to use Landrover Freelander studs, but beware! They have changed the specs over the years and some of them won’t have the chamfered edge like they used to, so you might as well use these Ford parts, they are cheaper anyway! The tube that I’m holding is the one that I’m using to press the studs in place.

Only the studs for the front need modification. What you need to do is take a grinder and you have to grind the head of the stud to a D shape, because the backside of the front hubs aren’t completely flat and otherwise your studs won’t pull in straight. You can see a modified stud next to the hub. You want to use a bit of red loctite (or equivalent) onto the knurled area to help hold the stud into the hub. The new studs will create new grooves in the hub, don’t worry if the new and old ones don’t match 100%.

I used a big vice and an extension on the handle to press the new studs in. Make sure that you’ve removed enough of the head of the stud, otherwise the stud will not be perpendicular to the hub, but will point slightly inwards.

Once all the studs have been installed, you can check your installation by taking a rear drum brake and see if the holes match the studs. You can also do this with a wheel, but beware, some steel wheels (Spitfire wheels and original steel wheels) will need to have mounting holes drilled out a little bit because of the size of the studs.

All studs installed with new open ended wheel nuts.

Now it’s time to paint the hub, I used the same black EpoxyMastic paint for all of the suspension components.

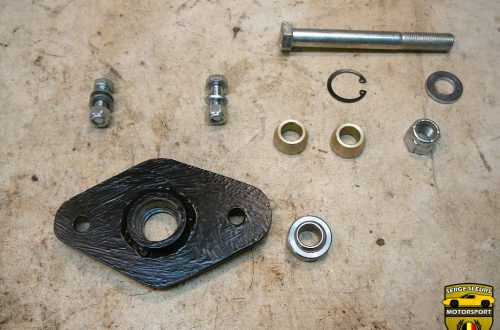
This is a front wheel bearing kit for Triumph Spitfire, like the Europa uses (You’ll need two kits). It comes with a packet of grease (which might be not quite enough), two new bearings and a felt-backed seal/washer, I am reusing the original D-washer.

The installation of the bearings is pretty simple. You use the original outer races to hammer in the new ones. Then you pack the bearings with the supplied grease (check the video for an easy method) and you put the remainder of the grease inside of the hub before you install the bearings in their races.

The felt side of the seal/washer needs to point towards the upright! You need to let some EP90 gear oil soak the felt before installation onto the stub axle. Also pay attention not to paint the mounting surfaces of the brake disc to prevent any disc run-out.

When you’ve made sure that the mounting surface is spotless, removing all the dirt or paint. We can install the new brake discs. I’m using grooved (uprated) discs supplied by Richard at Europa Engineering. I’m using all new mounting hardware throughout the suspension, I’m using Grade S bolts in UNF sizes (like the originals). Grade S is very close to the modern grade 8 bolts.

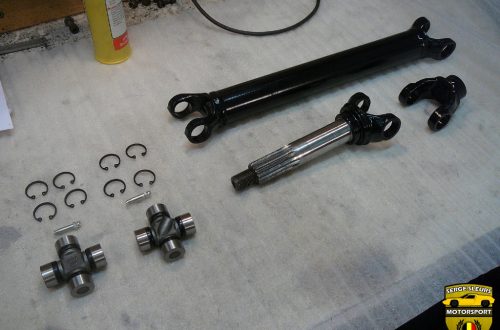
You’ve seen the picture of the two anti-rollbar (ARB) droplinks side-by-side, but I haven’t told you how I removed them. The droplinks are a notorious job on a Europa, just because they are a pain to replace. But I’ll show you some tricks that will help you through this ordeal.
To remove them, mount the ARB in a vice as pictured. Use some lubrication (I used WD40, but I think some dishwashing liquid might be more effective) on the bush and on the ARB end. Stand next to your vice along the edge of your workbench and pull the droplink towards the end with all your weight while trying to push your legs off your vice or workbench. This worked for me. If this is unsuccessful, you can try the trick I describe below.

If you think removing the droplinks is difficult, wait until you need to put them back on! The trick here is to slightly reshape the ends of the ARB. You can see I removed the small lip on the side to make the end a bit narrower (this will help you if you have trouble removing them). And I also rounded off the end, this will make it easier to slide on the new bush (already mounted in the repainted droplink). You need to do the entire end, I took a picture before I did the bottom to show the comparison.

Once everything has been repainted you can install the new bushes in the droplinks. I opted to replace all of the bushes with polyurethane bushes, even though it probably is all overkill. I used generic Superflex bushes that had the right size. They come with polyurethane-friendly grease, so I coated the inside of the droplink with the grease to ease installation.

Then I used a vice to press it in.

I forgot to take pictures of the installation of the other bush in the droplink. It is also a generic Superflex polyurethane bush, but it was a bush in one piece, so I cut it in half to make two top-hat style inserts, because the rim of the ‘hat’ was a bit too thick to pass through the droplink hole. You can see it installed on the picture above.

The installation of the droplink went surprisingly easy after the modifications that I had made to the ARB. I used the supplied grease to grease the ARB end and the inside of the bush. With the ARB mounted in a vice, just use your weight to wiggle the bush onto the end and it should slide right on.

This is the entire ARB assembly after restoration!

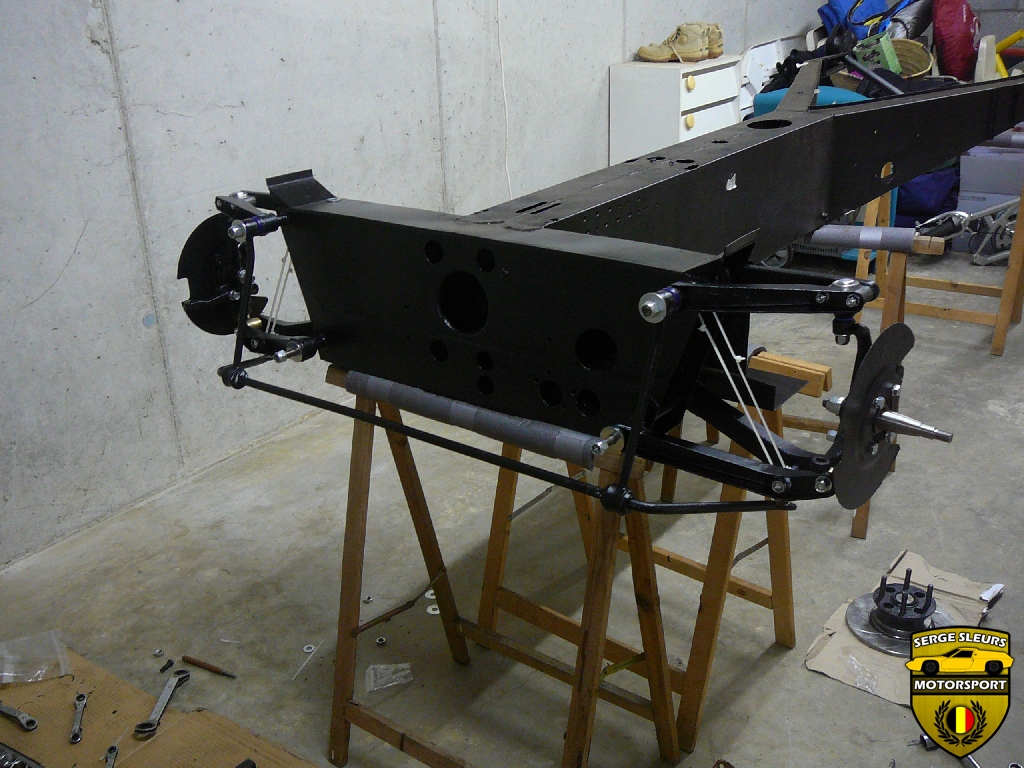
We’ve restored all of the individual components, now it’s time to mount everything to the chassis. I’m using brand new pivot pins. This is just a mockup, but I when it’s time for final assembly you want to mount these with anti-seize.

Now we can install the hub onto the stub axle.

These are the small mods that I mentioned earlier. These stub axles were advertised for Triumph Spitfire (as they should be), but the stud on the back wasn’t threaded far enough to seat it in the upright, so washers were added.

The washers were added to the front because the hole for the split pin was to far away from the face of the hub. You need to install the hub with the correct clearance. One way to do this, is to do up the castellated nut by hand (using a wrench perpendicular to the hub face) and then backing the nut off ‘one flat’ or to the closest position for the split pin. The washers are a temporary solution, I will need to tap the thread further onto the stud and drill a new hole for the split-pin.
These are the small mods that I mentioned earlier. These stub axles were advertised for Triumph Spitfire (as they should be), but the stud on the back wasn’t threaded far enough to seat it in the upright, so washers were added.

We need to oil the trunnions with EP90 gear oil. I just use an oil squirter and fill them until the oil starts seeping out from between the top trunnions seals.

Then we add a grease cap, and we’re done!
I hope you enjoyed this long blog post, I’ve also shot a lot of video, so a new video come online soon.
Enjoy & Share,
Serge